Spring Security Web 和 OAuth2
目录
1 前言
Spring Security 是一个多模块的项目,之前梳理了一下 Spring Security 认证流程,现在才发现,梳理的那部分内容更多的只是 Spring Security Core 这个核心模块中的内容。
日常使用时,还会更多的涉及 Spring Security Web 和 Spring Security OAuth2 中的东西,这篇博客的主要内容便是梳理一下这三者之间的关系,了解一下各自发挥的作用。
2 Spring Security Core
Spring Security Core 在整个 Spring Security 框架中扮演着重要的角色,提供了有关于认证和权限控制相关的抽象。
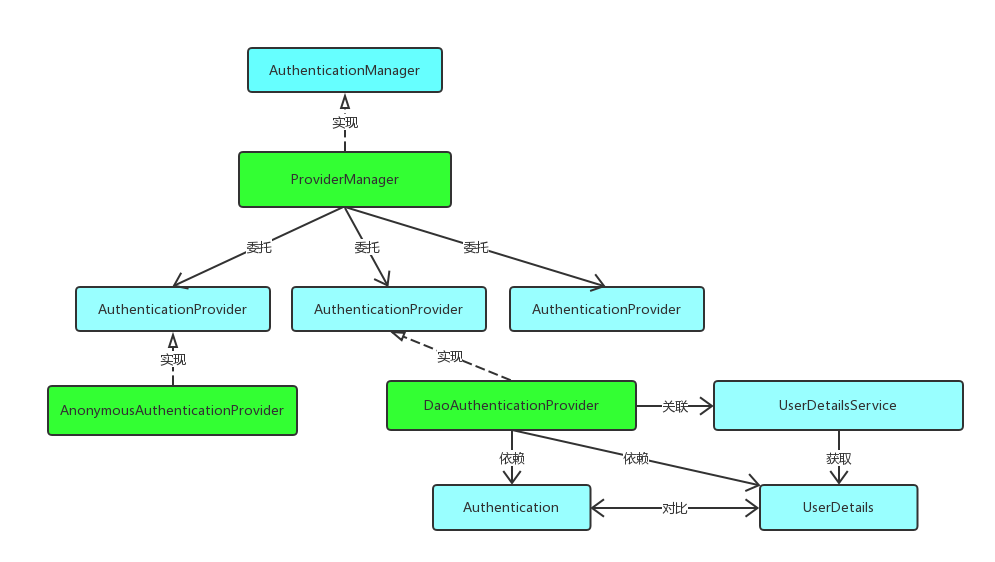
然而,在使用的过程中,我们接触的更多的可能是和认证相关的抽象,比如:
- 通过
AuthenticationManager提供了进行用户认证方法的抽象,允许通过ProviderManager和AuthenticationProvider来组装和实现自己的认证方法 - 通过
UserDetails和UserDetailsService提供了用户详细信息和获取用户详细信息方式的抽象 - 通过
Authentication提供了用户认证信息和认证结果的抽象 - 通过
SecurityContext和SecurityContextHolder提供了保存认证结果的方式 - ……
这些东西其实就是将传统的认证流程中的关键组成单独抽象了出来,结合传统的认证流程可以很容易的理解这些组件之间的关系,也可以看这张来自 Spring Security(一) —— Architecture Overview | 芋道源码 —— 纯源码解析博客 的一张图片:
而权限控制部分的抽象,主要就是 AccessDecisionManager 和 AccessDecisionVoter 了,这两个东西我目前还没有手动操作过,只能说,Spring Security Web 提供的服务太贴心,权限控制部分的实现并不需要我操太多心。
关于 Spring Security Core 模块更多的内容可以参考:
3 Spring Security Web
如果说 Spring Security Core 只是提供了认证和权限控制相关的抽象的话,Spring Security Web 便为我们提供了这些抽象的具体实现与应用。
Spring Security Web 通过 过滤器链 来实现了和 Web 安全相关的一系列功能,而用户的认证和权限控制只是其中的一部分,在这部分的实现中,过滤器充当 Spring Security Core 调用者的身份,一般流程为:
- 过滤器提取请求中的认证信息封装为
Authentication传递给AuthenticationManager进行认证,然后将认证结果放到SecurityContext中供后续过滤器使用 - 过滤器在请求进入端点前根据认证结果利用
AccessDecisionManager判断是否具备相应的权限
在这里,Spring Security Core 只是 Spring Security Web 利用的一部分功能,更为重要的是,整个过滤器链。
3.1 过滤器链的构建
之前本来只是想了解一下过滤器链的调用过程,但是看着看着,就跑到源码去了。反应过来的时候才发现,已经搞了这么多了停下来的话有点吃亏,就干脆把过滤器链的构建逻辑理了一下。
在梳理完构建器链的构建和调用逻辑后感觉,过滤器链的构建逻辑貌似没有好多用,还不如直接看过滤器链的调用逻辑……
这部分逻辑的梳理过程有些复杂,反正我调试的时候断点就在 build() 方法附近反复横跳,这里为了简单,就直接放结果了1:
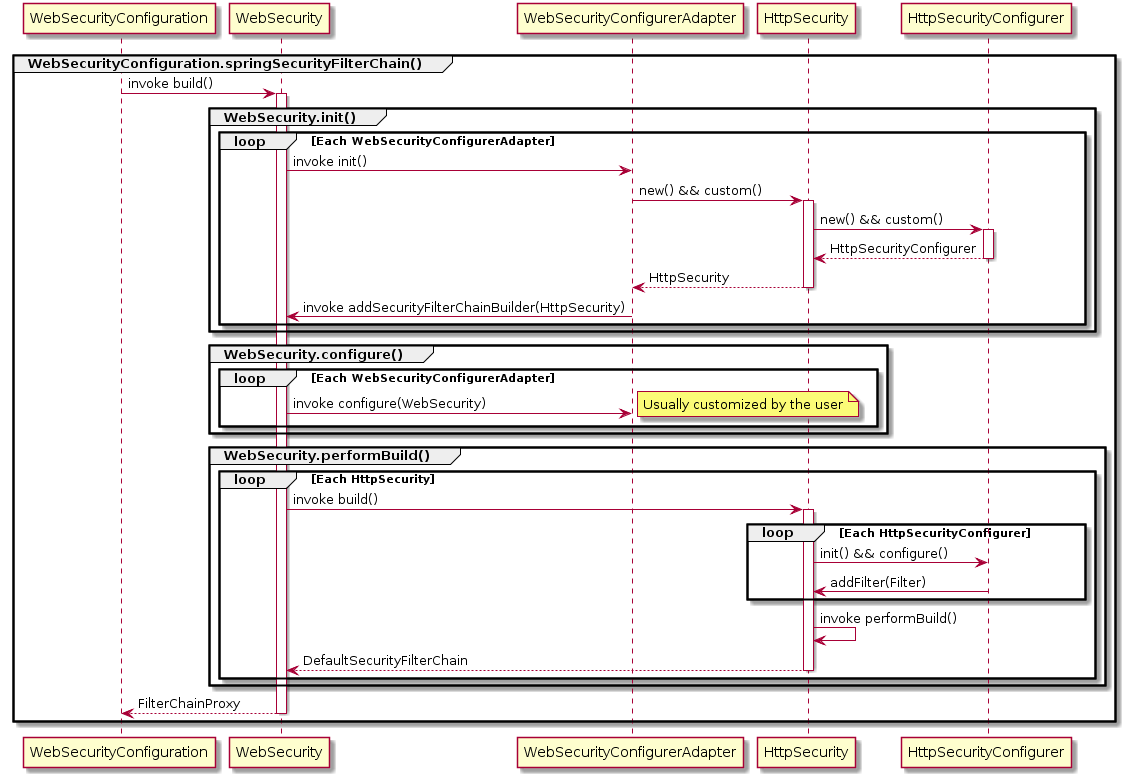
时序图画的不是很标准,大致意思一下就可以了哈( ̄▽ ̄),解析如下:
- Spring Security Web 中的过滤器链的构建主要是由
WebSecurity和HttpSecurity完成的 WebSecurity根据上下文中的WebSecurityConfigurer构建出HttpSecurity对象,然后通过HttpSecurity构建出SecurityFilterChain后,将SecurityFilterChain放到FilterChainProxy中。其中,WebSecurityConfigurer 的常用实现为WebMvcConfigurerAdapter, 而SecurityFilterChain的常用实现为DefaultSecurityFilterChainHttpSecurity根据直接添加的Filter和通过AbstractHttpConfigurer实现类构建的Filter生成过滤器链
这部分逻辑中,关键的对象分别是 WebSecurity 和它依赖的配置类 WebSecurityConfigurer, HttpSecurity 和它依赖的配置类 AbstractHttpConfigurer.
在实际的使用中,我们通常会继承 WebMvcConfigurerAdapter 这个 WebSecurityConfigurer 的实现类,然后在重写它的 configure(HttpSecurity) 方法:
@Configuration
public class SecurityConfig extends WebSecurityConfigurerAdapter {
    @Override
    public void configure(HttpSecurity http) throws Exception {
        // @formatter:off
        http
            .authorizeRequests()
              .antMatchers("/oauth/**")
              .authenticated()
              .and()
            .requestMatchers()
              .antMatchers("/oauth/**","/login/**","/logout/**")
              .and()
            .csrf()
              .disable()
            .formLogin()
              .permitAll();
        // @formatter:on
    }
}
在上面这个类中,我们继承了 WebSecurityConfigurerAdapter 这个类,当我们将自定义的类放到 Spring 上下文中后,就可以被 WebSecurity 拿到用于构建 HttpSecurity,而重写的 configure(HttpSecurity) 则会在 HttpSecurity 构建过滤器之前调用,完成过滤器链的配置。
其中,诸如 csrf() 之类的方法都会返回一个 AbstractHttpConfigurer 实现,允许我们对特定的过滤器进行配置。
到了最后,HttpSecurity 就可以根据相应的配置完成过滤器链的构建,然后再由 WebSecurity 将它们放到 FilterChainProxy 实例中返回。
3.2 过滤器链的调用
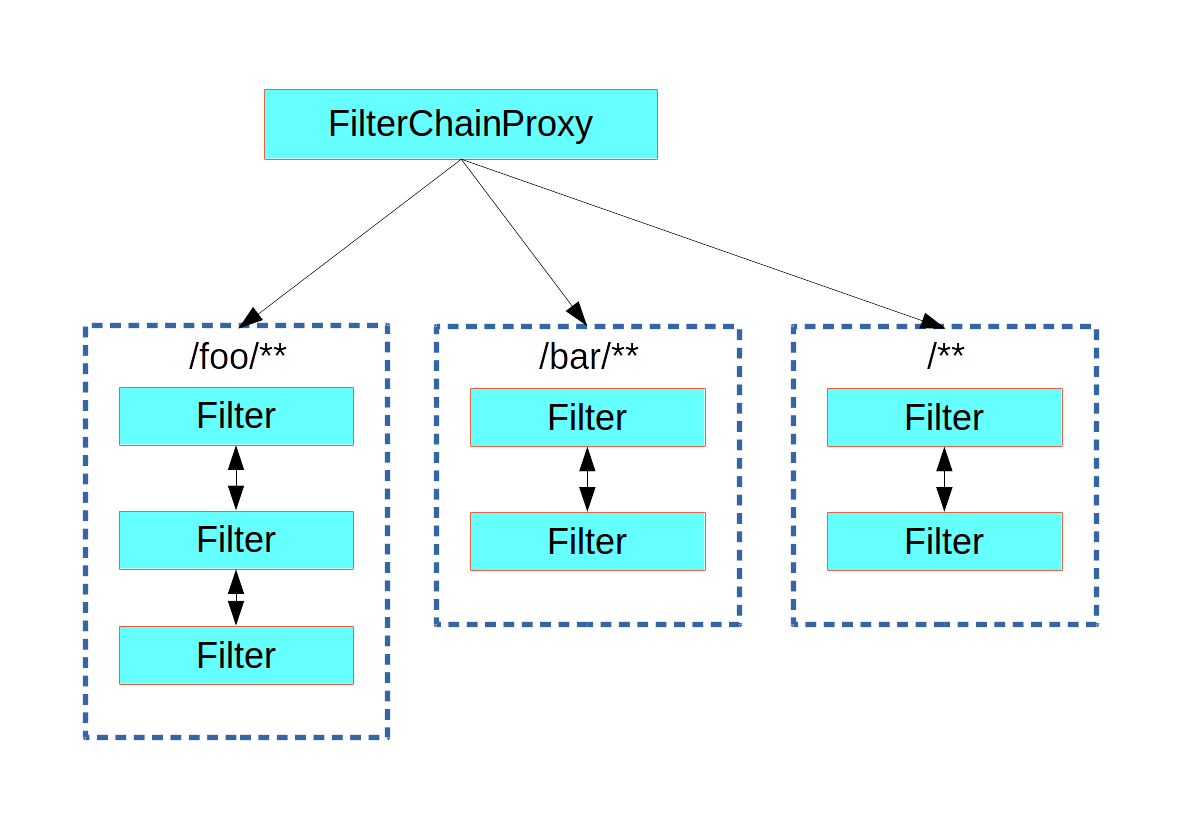
过滤器链的调用的话,主要涉及两个对象:FilterChainProxy 和 DefaultSecurityFilterChain,关键其实还是在 FilterChainProxy 上。
然而,这两个对象的源码都挺简单的,这里就不贴了,有兴趣的可以去看一下,这里简单说一下结果:
- FilterChainProxy 会作为 Servlet 容器过滤器链中的一个过滤器,当接收到请求后在持有的过滤器链中判断是否存在匹配的过滤器链
- 存在匹配的过滤器链时,会直接使用第一个匹配项对请求进行处理
- 不存在匹配的过滤器链或者匹配的过滤器链走完后,就会回到 Servlet 容器过滤器链继续执行
这里的关键点其实就是,存在多条过滤器链,每条过滤器链匹配一定的请求。之前看文档的时候不仔细,没有意识到这一点,饶了不少弯路 QAQ
附图:
3.3 过滤器链的使用
Spring Security Web 过滤器的使用主要就是自定义过滤器链,默认的过滤器链会添加一些 Spring Security Web 自带的一些过滤器,使用时,需要考虑是否去掉默认的一些过滤器器(或者不使用默认配置),并将自定义的过滤器添加到过滤器链中的一个合适的位置上。
这里会简要介绍部分内置过滤器的作用和过滤器的顺序,首先是内置的几个过滤器:
- 过滤器
SecurityContextPersistenceFilter可以从 Session 中取出已认证用户的信息 - 过滤器
AnonymousAuthenticationFilter在发现SecurityContextHolder中还没有认证信息时,会生成一个匿名认证信息放到SecurityContextHolder - 过滤器
ExceptionTranslationFilter可以处理FilterSecurityInterceptor中抛出的异常,进行重定向、输出错误信息等 - 过滤器
FilterSecurityInterceptor对认证信息的权限进行判断,权限不足时抛出异常
在自定义过滤器时(通常是认证过滤器),我们需要考虑自定义过滤器的位置,比如,我们不应该把自定义的认证过滤器放在 AnonymousAuthenticationFilter 的后面,官方文档对过滤器的顺序给出了解释:在去除一些过滤器后,大致顺序就为:
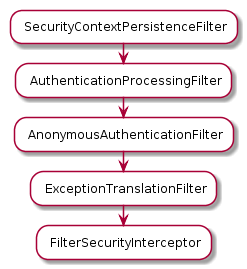
其中,AuthenticationProcessingFilter 是指认证过滤器实现,比如常用的 UsernamePasswordAuthenticationFilter 这个过滤器。
完整的顺序可以参考:
在这个顺序中,由于 SecurityContextPersistenceFilter 可能从 Session 中取出已认证用户的信息,因此,自定义过滤器时应该考虑 SecurityContextHolder 是不是已经存在用户认证信息。或者在登录/注册相关 URL 的过滤器链中设置认证用户账户密码的过滤器,在其他过滤器链中设置认证 token 的过滤器。
4 Spring Security OAuth2
Spring Security OAuth2 建立在 Spring Security Core 和 Spring Security Web 的基础上,提供了对 OAuth2 授权框架的支持。
其中,最为复杂的部分是在 授权服务器 上,相对的,资源服务器基本上就是重用 Spring Security Web 提供的过滤器链,通过过滤器 OAuth2AuthenticationProcessingFilter 和请求携带的 Token 获取认证信息,因此,这里的重心会放在授权服务器上。
4.1 授权服务器
对于传统的认证方式来说,简单认证用户的信息基本上就足够了,但是对于 OAuth2 来说是不够的,对于 OAuth2 授权服务器来说,除了需要完成用户的认证以外,还需完成客户端的认证,还需要效验客户端请求的 Scope,因此,单凭过滤器链是不足以完成两者的认证的,因为 SecurityContextHolder 只能持有一个认证结果。
于是,Spring Security OAuth2 采用的认证策略便是:在过滤器链中完成客户端或用户的认证,然后再在端点的内部逻辑中完成剩余信息的效验。而这个认证策略,在不同模式中也是不一样的。
这里主要会对 授权码模式 和 密码模式 中的认证策略进行介绍,因为这两个模式中使用到的端点 AuthorizationEndpoint 和 TokenEndpoint 已经涵盖了两条主要的过滤器链。
4.1.1 授权码模式
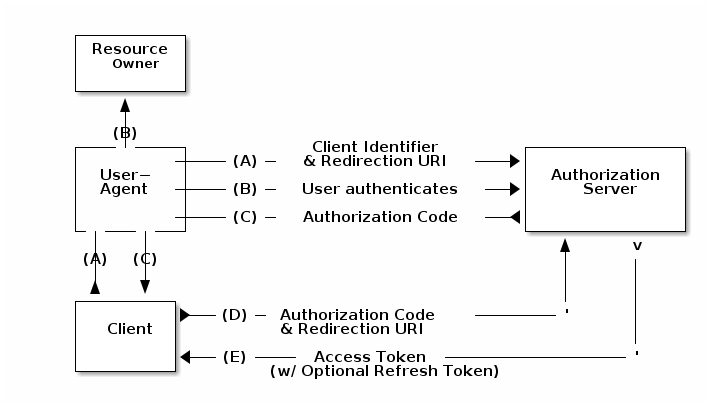
首先是授权码模式,对于授权码模式来说,请求流程通常是先到 /oauth/authorize 获取授权码,然后再到 /oauth/token 获取 Token,对于 /oauth/authorize 这个端点的过滤器链来说,认证的是用户的信息,认证通过后进入端点内部,会对客户端请求 Scope 和用户的 Approval 进行效验,效验通过会生成授权码返回给客户端。
其实这里也就可以明白为什么 /oauth/authorize 这个端点需要对用户进行认证了,因为,这里需要获取的是 用户 的授权。
然后客户端拿着授权码去 /oauth/token 这个端点获取 Token 时,该端点的过滤器链会对客户端进行认证,认证通过后进入端点内部,这时端点内部会对客户端请求的 Scope 进行效验,效验通过后就会通过 TokenGranter 生成 Token 返回给客户端。
也就是说,对于授权码模式来说:
- 端点
/oauth/authorize完成用户的认证、客户端请求的 Scope 的效验、用户的授权检查 - 端点
/oauth/token完成客户端的认证,客户端请求的 Scope 的效验、客户端授权码的检查
这其实就可以看做时对授权码模式的代码解释,因为,在授权码模式中,去获取 Token 的往往不是用户操作的客户端,因此,需要认证客户端是否是受信任的。
相关逻辑对应的源码,去掉了一部分效验代码:
@RequestMapping(value = "/oauth/authorize")
public ModelAndView authorize(Map<String, Object> model, @RequestParam Map<String, String> parameters, SessionStatus sessionStatus, Principal principal) {
  AuthorizationRequest authorizationRequest = getOAuth2RequestFactory().createAuthorizationRequest(parameters);

  try {
    // 未通过认证的请求会抛异常
    if (!(principal instanceof Authentication) || !((Authentication) principal).isAuthenticated()) {
      throw new InsufficientAuthenticationException("User must be authenticated with Spring Security before authorization can be completed.");
    }

    ClientDetails client = getClientDetailsService().loadClientByClientId(authorizationRequest.getClientId());

    // 效验 Scope
    oauth2RequestValidator.validateScope(authorizationRequest, client);

    // 效验用户的授权
    authorizationRequest = userApprovalHandler.checkForPreApproval(authorizationRequest, (Authentication) principal);
    boolean approved = userApprovalHandler.isApproved(authorizationRequest, (Authentication) principal);
    authorizationRequest.setApproved(approved);

    // Validation is all done, so we can check for auto approval...
    if (authorizationRequest.isApproved()) {
      if (responseTypes.contains("token")) {
        return getImplicitGrantResponse(authorizationRequest);
      }
      if (responseTypes.contains("code")) {
        return new ModelAndView(getAuthorizationCodeResponse(authorizationRequest, (Authentication) principal));
      }
    }

    return getUserApprovalPageResponse(model, authorizationRequest, (Authentication) principal);
  }
  catch (RuntimeException e) {
    sessionStatus.setComplete();
    throw e;
  }
}

@RequestMapping(value = "/oauth/token", method=RequestMethod.POST)
public ResponseEntity<OAuth2AccessToken> postAccessToken(Principal principal, @RequestParam Map<String, String> parameters)
  throws HttpRequestMethodNotSupportedException {

  // 可以看到,通过效验的是客户端
  String clientId = getClientId(principal);
  ClientDetails authenticatedClient = getClientDetailsService().loadClientByClientId(clientId);

  TokenRequest tokenRequest = getOAuth2RequestFactory().createTokenRequest(parameters, authenticatedClient);

  // 效验请求的 Scope
  if (authenticatedClient != null) {
    oAuth2RequestValidator.validateScope(tokenRequest, authenticatedClient);
  }

  if (isAuthCodeRequest(parameters)) {
    // The scope was requested or determined during the authorization step
    if (!tokenRequest.getScope().isEmpty()) {
      tokenRequest.setScope(Collections.<String> emptySet());
    }
  }

  // 调用 TokenGranter 进行授权
  OAuth2AccessToken token = getTokenGranter().grant(tokenRequest.getGrantType(), tokenRequest);
  if (token == null) {
    throw new UnsupportedGrantTypeException("Unsupported grant type: " + tokenRequest.getGrantType());
  }
  return getResponse(token);
}
授权码模式流程图:
4.1.2 密码模式
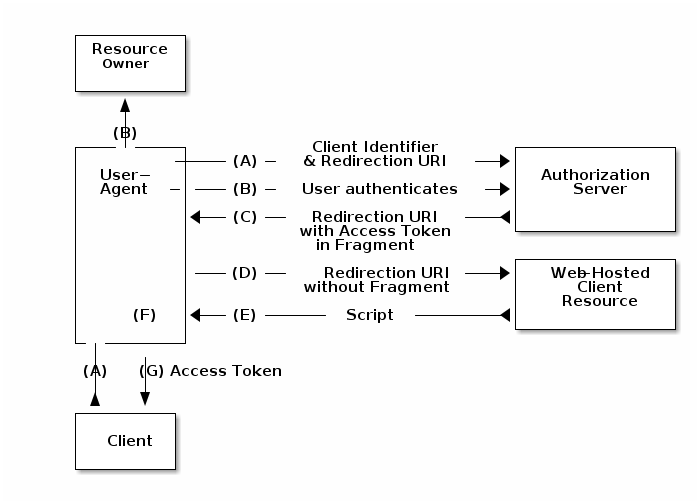
密码模式,或者说简化模式,只有一个端点即 /oauth/token 这个端点,也就是说,这个端点要同时完成用户和客户端的认证。
但是,这个端点不可能同时拥有两个过滤器链,而为了支持授权码模式,这个端点的过滤器链的职责已经确定了,就是完成客户端的认证。因此,用户的认证就只能在端点内部逻辑完成。
当 TokenEndpoint 发现授权模式为 密码模式 时,会将 ResourceOwnerPasswordTokenGranter 放入 TokenGranter, 而 ResourceOwnerPasswordTokenGranter 进行授权时会调用 AuthenticationManager 来完成对用户的认证,认证成功才会通过 TokenService 生成 Token 返回。
// AuthorizationServerEndpointsConfigurer.getDefaultTokenGranters
private List<TokenGranter> getDefaultTokenGranters() {
  List<TokenGranter> tokenGranters = new ArrayList<TokenGranter>();
  tokenGranters.add(new AuthorizationCodeTokenGranter(tokenServices, authorizationCodeServices, clientDetails, requestFactory));
  tokenGranters.add(new RefreshTokenGranter(tokenServices, clientDetails, requestFactory));
  tokenGranters.add(new ImplicitTokenGranter(tokenServices, clientDetails, requestFactory));
  tokenGranters.add(new ClientCredentialsTokenGranter(tokenServices, clientDetails, requestFactory));
  if (authenticationManager != null) {
    tokenGranters.add(new ResourceOwnerPasswordTokenGranter(authenticationManager, tokenServices, clientDetails, requestFactory));
  }
  return tokenGranters;
}
密码模式流程图:
4.1.3 客户端认证
通过对 授权码模式 和 密码模式 的了解我们知道了客户端的认证是在过滤器链中完成的,这个认证可以通过 BasicAuthenticationFilter 完成,但更通用的大概是 ClientCredentialsTokenEndpointFilter 这个过滤器。
其内部的认证流程其实是很简单的,最为重要的一点是,它用的还是 Spring Security Core 那一套!
@Override
public Authentication attemptAuthentication(HttpServletRequest request, HttpServletResponse response)
  throws AuthenticationException, IOException, ServletException {

  String clientId = request.getParameter("client_id");
  String clientSecret = request.getParameter("client_secret");

  // If the request is already authenticated we can assume that this filter is not needed
  Authentication authentication = SecurityContextHolder.getContext().getAuthentication();
  if (authentication != null && authentication.isAuthenticated()) {
    return authentication;
  }

  UsernamePasswordAuthenticationToken authRequest = new UsernamePasswordAuthenticationToken(clientId, clientSecret);

  // 通过 AuthenticationManager 完成认证
  return this.getAuthenticationManager().authenticate(authRequest);
}
我们知道,Spring Security OAuth2 提供了 ClientDetails 和 ClientDetailsService 这两种抽象,它们和 UserDetails 和 UserDetailsService 是不兼容的,这时,可以选择自己实现一个 AuthenticationProvider 使用 ClientDetails 和 ClientDetailsService,但也可以将 ClientDetails 和 ClientDetailsService 转换为 UserDetails 和 UserDetailsService,Spring Security OAuth2 通过 ClientDetailsUserDetailsService 来完成这一转换:
public class ClientDetailsUserDetailsService implements UserDetailsService {
  private final ClientDetailsService clientDetailsService;

  public ClientDetailsUserDetailsService(ClientDetailsService clientDetailsService) {
    this.clientDetailsService = clientDetailsService;
  }

  public UserDetails loadUserByUsername(String username) throws UsernameNotFoundException {
    ClientDetails clientDetails;
    try {
      clientDetails = clientDetailsService.loadClientByClientId(username);
    } catch (NoSuchClientException e) {
      throw new UsernameNotFoundException(e.getMessage(), e);
    }
    String clientSecret = clientDetails.getClientSecret();
    if (clientSecret== null || clientSecret.trim().length()==0) {
      clientSecret = emptyPassword;
    }
    return new User(username, clientSecret, clientDetails.getAuthorities());
  }
}
4.1.4 TokenGranter
Spring Security OAuth2 中授权码的生成时通过 TokenGranter 来完成的,进行授权码的生成时,会遍历拥有的各个 TokenGranter 实现,直到成功生成 Token 或者所有 TokenGranter 实现都不能生成 Token。
生成 Token 也是一个可以抽象出来的环节,因此,Spring Security OAuth2 通过 TokenService 和 TokenStore 来生成、获取和保存 Token。
public abstract class AbstractTokenGranter implements TokenGranter {
  private final AuthorizationServerTokenServices tokenServices;

  private final ClientDetailsService clientDetailsService;

  private final OAuth2RequestFactory requestFactory;

  private final String grantType;

  protected AbstractTokenGranter(AuthorizationServerTokenServices tokenServices,
      ClientDetailsService clientDetailsService, OAuth2RequestFactory requestFactory, String grantType) {
    this.clientDetailsService = clientDetailsService;
    this.grantType = grantType;
    this.tokenServices = tokenServices;
    this.requestFactory = requestFactory;
  }

  public OAuth2AccessToken grant(String grantType, TokenRequest tokenRequest) {
    // 每个 TokenGranter 对应一种授权类型
    if (!this.grantType.equals(grantType)) {
      return null;
    }

    String clientId = tokenRequest.getClientId();
    ClientDetails client = clientDetailsService.loadClientByClientId(clientId);
    validateGrantType(grantType, client);

    // 获取授权码
    return getAccessToken(client, tokenRequest);
  }

  protected OAuth2AccessToken getAccessToken(ClientDetails client, TokenRequest tokenRequest) {
    return tokenServices.createAccessToken(getOAuth2Authentication(client, tokenRequest));
  }
}

// 默认的 TokenServices 的部分代码
public class DefaultTokenServices {
  @Transactional
  public OAuth2AccessToken createAccessToken(OAuth2Authentication authentication) throws AuthenticationException {
    // 首先从 TokenStore 中获取 Token
    OAuth2AccessToken existingAccessToken = tokenStore.getAccessToken(authentication);
    OAuth2RefreshToken refreshToken = null;
    if (existingAccessToken != null) {
      if (existingAccessToken.isExpired()) {
        if (existingAccessToken.getRefreshToken() != null) {
          refreshToken = existingAccessToken.getRefreshToken();
          tokenStore.removeRefreshToken(refreshToken);
        }
        tokenStore.removeAccessToken(existingAccessToken);
      }
      else {
        // Re-store the access token in case the authentication has changed
        tokenStore.storeAccessToken(existingAccessToken, authentication);
        return existingAccessToken;
      }
    }

    if (refreshToken == null) {
      refreshToken = createRefreshToken(authentication);
    }

    OAuth2AccessToken accessToken = createAccessToken(authentication, refreshToken);
    // 保存 accessToken
    tokenStore.storeAccessToken(accessToken, authentication);
    refreshToken = accessToken.getRefreshToken();
    if (refreshToken != null) {
      tokenStore.storeRefreshToken(refreshToken, authentication);
    }
    return accessToken;
  }

  // 从 TokenStore 中获取 Token
  public OAuth2AccessToken getAccessToken(OAuth2Authentication authentication) {
    return tokenStore.getAccessToken(authentication);
  }
}
简单来说就是:
- 在过滤器链和端点内部逻辑中完成客户端和用户的认证与 Scope 的效验
- 通过 TokenGranter 生成 Token,而 TokenGranter 通过 TokenService 创建 Token,TokenStore 可以保存 Token
4.2 资源服务器
资源服务器相较于授权服务器来说就要简单多了,和传统的流程差不多,通过过滤器 OAuth2AuthenticationProcessingFilter 和 OAuth2AuthenticationManager 验证 Token 并获取认证信息:
public class OAuth2AuthenticationProcessingFilter implements Filter, InitializingBean {
  public void doFilter(ServletRequest req, ServletResponse res, FilterChain chain) throws IOException, ServletException {
    final HttpServletRequest request = (HttpServletRequest) req;
    final HttpServletResponse response = (HttpServletResponse) res;

    // 从请求头中提取 Token
    Authentication authentication = tokenExtractor.extract(request);

    Authentication authResult = authenticationManager.authenticate(authentication);

    SecurityContextHolder.getContext().setAuthentication(authResult);

    chain.doFilter(request, response);
  }
}

public class OAuth2AuthenticationManager implements AuthenticationManager, InitializingBean {
  public Authentication authenticate(Authentication authentication) throws AuthenticationException {
    String token = (String) authentication.getPrincipal();

    // 通过 TokenService 获取认证信息
    OAuth2Authentication auth = tokenServices.loadAuthentication(token);

    if (auth == null) {
      throw new InvalidTokenException("Invalid token: " + token);
    }

    checkClientDetails(auth);

    if (authentication.getDetails() instanceof OAuth2AuthenticationDetails) {
      OAuth2AuthenticationDetails details = (OAuth2AuthenticationDetails) authentication.getDetails();
      // Guard against a cached copy of the same details
      if (!details.equals(auth.getDetails())) {
        // Preserve the authentication details from the one loaded by token services
        details.setDecodedDetails(auth.getDetails());
      }
    }
    auth.setDetails(authentication.getDetails());
    auth.setAuthenticated(true);
    return auth;
  }
}
5 Spring Security JWT
很多地方都可以看到 JWT 在 OAuth2 中的使用,Spring Security JWT 在 Spring Security OAuth2 中便扮演了 TokenService 和 TokenStore 的角色,用于生成和效验 Token。
但是,我还是很想吐槽一下 JWT 这个东西。当初刚看到的时候感觉很有趣,使用 JWT 可以直接在 Token 中携带一些信息,同时服务端还不用存储 Token 的信息。
然而,在实际的一些使用中,可能会遇见需要作废还有效的 JWT Token 的需求,这对于 JWT 来说是无法实现的。为了实现这一需求,就只能在服务端存储一些信息。
但是,既然都要在服务端存储信息了,那干嘛还用 JWT 呢?只要需要在服务端存储信息,那么,用不用 JWT 都没多大区别了啊……
6 结语
Spring Security 真的是一个很复杂的框架,目前设计的还只是在 Servlet 程序中的应用,然鹅我目前突然对 Spring WebFlux 产生了一点兴趣,不知道 Spring Security 在 Spring WebFlux 中是啥样的……
另外,我想说的是,Spring Security 的官方教程真的很棒,将大体的架构都解释清楚了,可惜吃了英语的亏 T_T
7 参考链接
Spring Security 整体相关的资料:
- TERASOLUNA Server Framework for Java (5.x) Development Guideline
- Spring Security 架构 | LeeReindeer's blog
Spring Security Web 相关的资料:
- Spring Security验证流程剖析及自定义验证方法 - Decouple - 博客园
- Spring Security 的 Web 应用和指纹登录实践
- Spring Security Reference
Spring Security OAuth2 相关的资料:
脚注:
对详细过程有兴趣的,可以看我的笔记 Spring Security Web 过滤器链的构建